The number of sources supported by Webcampak is defined during the installation process. Each source is independent and can receive and send pictures to/from another Webcampak or another source from the same Webcampak.
Each source is configured via its dedicated menu in the administration panel.
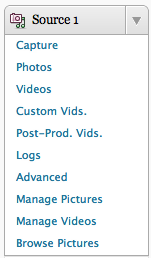
As you can see, 10 sections are available for each source:
Capture: configure the mean used to capture a picture.
Photos: define manipulation to be applied to the picture, it can be either a picture modification, disk space management, or sending a picture to external FTP servers.
Videos: define settings used to generate a daily video, created each day at 1h00 am.
Custom Vids.: define settings used to generate a custom video, including a start and end date.
Post-Prod. Vids.: define mass modifications of pictures in order to prepare them for post-production using a dedicated software. This section can also be used to copy pictures between sources.
Logs: view logs related to the source (capture, video, custom video, post-prod).
Advanced: define advanced settings such as email, source FTP account, ...
Manage Pictures: overview of disk space used by pictures, let you delete days. Same actions can be performed over FTP.
Manage Videos: overview of disk space used by videos, let you delete videos; Same actions can be performed over FTP.
Browse Pictures: link to the viewer panel.
This section of the document will contained as much details as possible about all Webcampak settings used to configure a source.
Tip
Webcampak is a complex product, we strongly advise you to read the document entirely before beginning configuration.
This section contains settings related to acquisition of pictures.
This is probably the single most important bloc of Webcampak configuration, it will define where pictures will come from and at which rate they should be captured.
Use this option to enable / disable a source. An inactive source will not be processed by the system (including video creation).
Define where pictures should be captured from, 6 types are available:
USB camera(Gphoto2 mode PTP)
Choose this option is an USB camera (DSLR or point-and-shoot) is physically connected to Webcampak.
USB webcam
Choose this option is an USB webcam is physically connected to Webcampak.
IP Camera (FTP)
Choose this option is an IP camera, another Webcampak or another source from the same Webcampak has been configured to regularly send pictures to /tmp/ directory of the source. Webcampak will regularly check this directory and process uploaded pictures if any.
Internet Picture (HTTP or FTP)
Choose this option if you want Webcampak to capture a picture over HTTP or FTP. This picture can be located on Internet, on another Webcampak or on another source of this same Webcampak.
If you plan to use another Webcampak (or another source), you will need to link to a "hotlink" image, just ensure its resolution will be large enough to fit your requirements.
Streaming (RTSP)
Choose this option is you want to extract a picture from a RTSP stream. This option has been rarely tested.
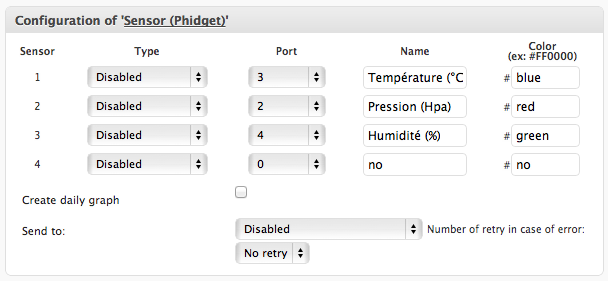
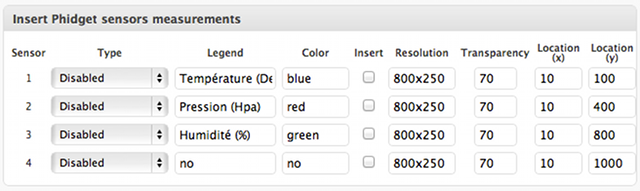
Phidget sensor
This is a particular option, it does not capture picture but values from Phidget sensors.
More settings related to those types are available below in this page.
Define the capture rate you want to use for the source.
We would recommend not to go lower than 10s, although frequency is highly dependent of the camera, its settings and Webcampak hardware performances. Take capture time in consideration, especially during night shots.
If a capture is started when another capture is not completed there is a risk to hang the camera.
Usually a 30s capture rate should be considered as the minimum value for a long lasting setup (months of capture), most situations will accommodate slower capture rate (on picture every 5mn, 15mn, ...).
If you plan to use a capture rate lower than 1 minute, you will need to selected a multiple of 60 (for example: 10s, 15s, 20s, 30s)
This setting does not apply for IP Camera (FTP), it defines the time to be taken in consideration for pictures, either the time the script starts or the time the picture is actually taken.
It is particularly interesting when used with "Capture delay" setting, and especially with "Internet Picture", for example when you want to change capture rate between sources.
For example: Source 1 capture at one picture per minute with the objective to create a timelapse video at the end of the project. You want to send one picture every 5 minutes (source 2) to your website. You need to ensure that processing is finished for source 1 before requesting capture from source 2 (as source 2 will capture its picture from source 1). For this purpose you will implement a capture delay, corresponding to source 1 processing time. If you select "script start time" as "Picture date" your picture will have the same date than source 1 (otherwise picture date would have been script start date + capture delay).
On the other hand, it might sometime be necessary to have very accurate date associated to pictures, if you select "Capture time" the date will be extracted right before the shot is actually taken.
Minimum amount of time between two capture, any capture request below this value will be refused.
As explained previously, this option delay capture of a picture.
For example, with a capture rate of one per minute, capture will take place at 18h00, 18h01, 18h02, ... If you implement a 25s capture delay, capture will take place at 18h00"25, 18h01"25, 18h02"25, ...
If this option is activated more details will be available in logs (should only be used in case of issue).
If this option is activated, you will receive an e-mail automatically in case of capture error (i.e. camera failure).
E-mail settings can be configured in "Advanced" section of the source.
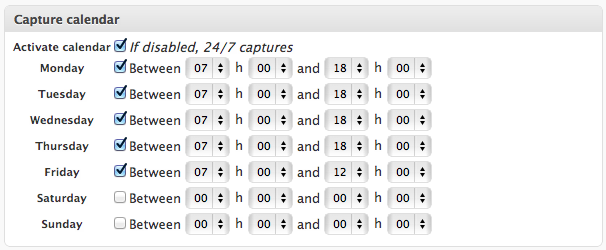
This option will let you select which days and hours capture should take place.
If this option is not selected, captures will take place 24 / 7.
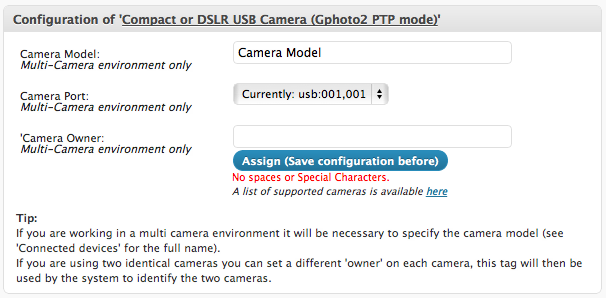
If only one camera is connected Webcampak will try to capture from this camera, so settings in this sections are really useful if multiple cameras are currently connected to the system.
To use multiple cameras simultaneously, start by activating the appropriate option in "System" menu.
"Camera Port" is only useful to force capture on a specific port and during the "Camera Owner" assignment process if multiple cameras are used simultaneously.
As mentioned previously, if multiple cameras are connected, Webcampak must be able to differentiate them, there are two ways of doing this:
If cameras are different, Webcampak will use camera model to differentiate cameras. Copy into "Camera Model" the model as mentioned in "Connected Devices" section of the administration panel.
For example:
Model                          Port
----------------------------------------------------------
Canon EOS 550D                 usb:001,002
Mention "Canon EOS 550D" in "Camera Model".
Webcampak will then look for the camera before any capture.
If cameras are identical (or detected identical by the system) Webcampak will insert a specific tag inside each camera.
First select the USB port (Camera Port) corresponding to the camera (connecting one single camera at this stage makes things easier).
Then, choose a tag to be inserted within the camera (Camera Owner), this tag should be simple, with no special characters and no spaces (for example CAM01) and save the page.
Once done, click on "Assign", the tag will then be inserted into the camera (using "owner" setting).
You need to do the same manipulation on all connected cameras.
You can find all details about USB webcams in "Connected Devices" section.
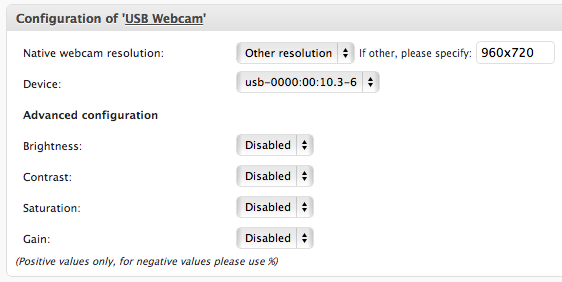
Mention the USB webcam native resolution as detected by the system in "Connected Devices" section.
This section contains settings related to processing pictures coming from an IP camera or another Webcampak source.
This section is useful to create cascaded sources in order to apply multiple different manipulations to one single picture by moving it from sources to sources.
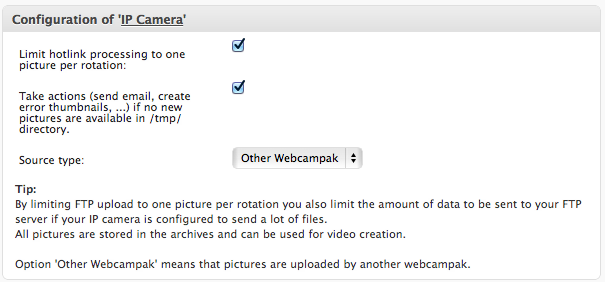
IP camera or other Webcampak sources must be configured to send pictures, via FTP, to /tmp/ directory of the source.
Source FTP account can be configured in the "Advanced" section of each source.
When activated, Webcampak will only create a hotlink for the last captured picture uploaded to /tmp/ directory.
This option is interesting when capture rate on the current source is slower than capture rate of the source sending the picture.
There might be situations where no pictures are available in /tmp/ directory (for example in case of network issue), in such situation and if this option is selected an email will be sent and an error hotlink will get created.
When using pictures uploaded by an IP camera or another Webcampak, no pictures is /tmp/ directory does not necessarily means that no pictures has been taken. A network issue could have delayed transmission of pictures, and you could decide not to generate errors in such a situation.
This option is useful to define how to assign a date to a picture, two options are available:
Other Webcampak: in this situation, picture filename is used as a date and pictures are located in a different directory on a daily basis.
All kind of source: picture date is based upon the time the picture has been uploaded to /tmp/ directory. This situation is less accurate.
Webcampak can capture pictures coming from Internet or from a video stream. This section also makes possible to capture from another Webcampak or another source from the same Webcampak.
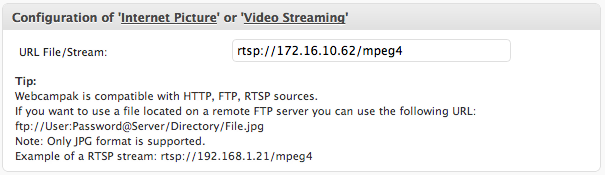
Simply mention the URL of the picture of RTSP stream.
Previous section of this document contains picture acquisition. This picture is not ready to be manipulated and manipulations are details in "Photos" section of the administration panel.
Manipulations are applied in a defined sequence, as displayed in this document and the administration panel (for example, watermark is applied over a cropped picture, legend is applied over a Watermark, ...)
All sizes and dimensions in this document are in pixels (px). Source location (with the exception of legend) is always the top left corner of the picture.
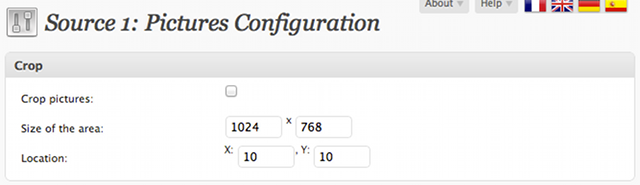
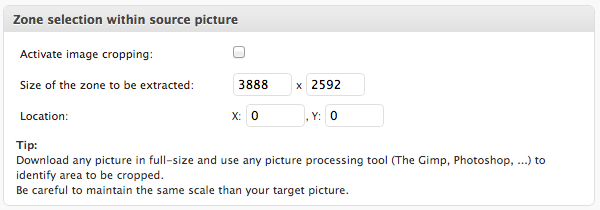
Once captured, you can crop the picture to keep only interesting elements. This option let Webcampak fir various situations:
"simple" crop: only keep a specific portion of a picture.
"wide" crop: change picture format (from 4/3 to 16/9 for example).
Zoom: this option can also be used to zoom inside a picture, by using multiple sources you can zoom in multiple areas of the same picture.
To crop your picture you need to detail two parameters:
Size of the area: in pixels, included inside the source picture.
Location: in pixels, from the top left corner.
We recommend to use a picture manipulation tool (The Gimp, Photostop, Pain.Net, ...) to try various situations and identify precisely coordinates.
Cropping pictures on the fly allow your viewers to focus on a defined area and ease video creation, if you use this option on very high resolution pictures you can extract multiple zones from a single picture.
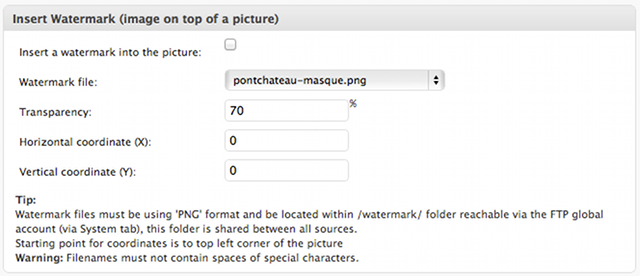
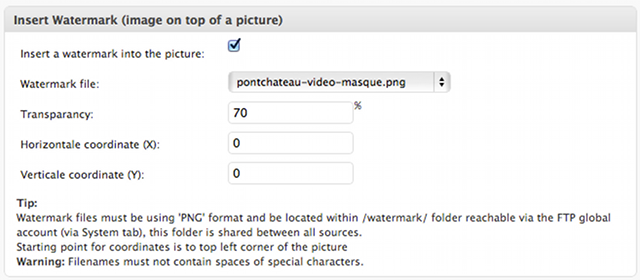
A watermark is an image (a logo for example) inserted on top of a captured picture. This image must be "PNG" and have an "Alpha" channel (transparency).
To add a watermark, log into Webcampak global FTP account (wpresources) and copy the image to /watermark/ directory.
Watermark file: select the file you would like to insert.
Transparency: define transparency of the watermark file when inserted on top of the picture.
Horizontal coordinate (X): define location of the watermark on X axis starting from left of the picture.
Vertical coordinate (X): define location of the watermark on Y axis starting from top of the picture.
If you plan to generate a timelapse at the end of your project and don't want to "pollute" your pictures with a watermark you can use cascaded sources. Watermark can also be added during video creation process (this is less efficient as all pictures will be processed together, it will slightly increase video creation time).
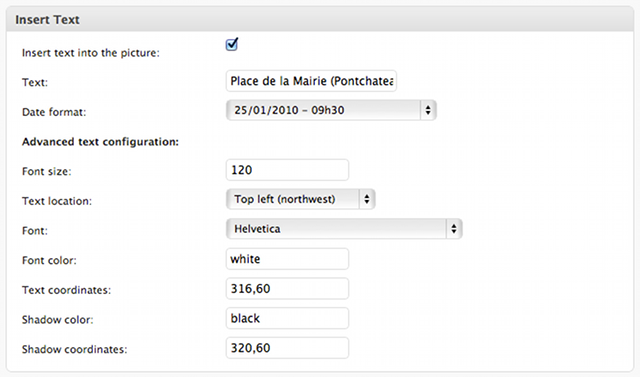
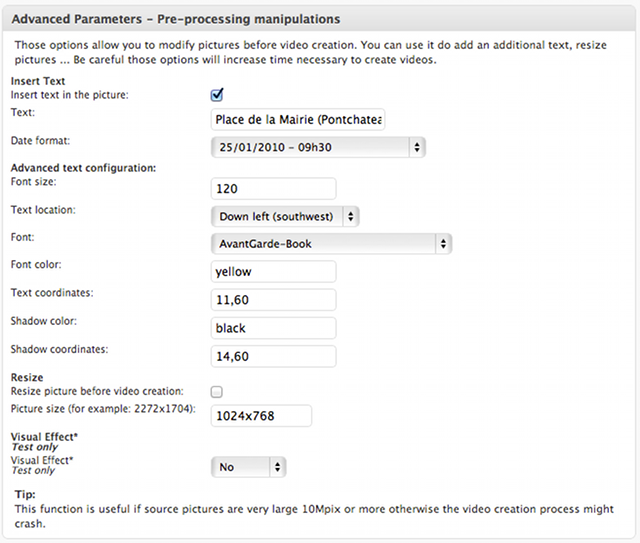
This option will insert text inside the picture (and on top of watermark if any), the following settings are available:
Text: Text to be inserted, a date can be added next to it (if you select a date, think about adding a separation, such as a blank space).
Date format: If you want to add a date, select its layout.
Define text settings, such as font and location:
Font size: size in pixels.
Text location: select reference location (coordinates will be calculated from this location).
Font: select the font.
Shadow color: to make the text easier to read you can add a shadow. Shadow is usually black or white.
Shadow coordinates: in pixels from text location. It is advised to move by 1 to 3 pixels compared to text coordinates.
Text color: color of the text
Text coordinates: in pixels from text location.
Coordinates are defined in pixels from reference point (text location), for example, if you want your text to be located 20 pixels from left of the picture and 40 pixels from the bottom of the picture you will choose the following settings:
Font coordinates: 24,40
Shadow coordinates: 26,40
Text location: Down left (southwest)
Static pictures (or hotlink) are pictures with a consistent name with content being updated regularly. This is let a webmaster insert a live picture, generated by Webcampak, on its website.

For example, if you want to upload a static image on your website (http://www.myconstructioncompany.com) in /webcam/ directory, you will be able to use, on your website, http://www.myconstructioncompany.com/webcam/webcam-1024x768.jpg to link to the latest captured picture. This file will be updated automatically and regularly by Webcampak.
Four different sizes are available to match various constraints (mobile, low bandwidth, high quality, ...).
This module define mechanisms to store and purge pictures automatically on Webcampak hard disk.
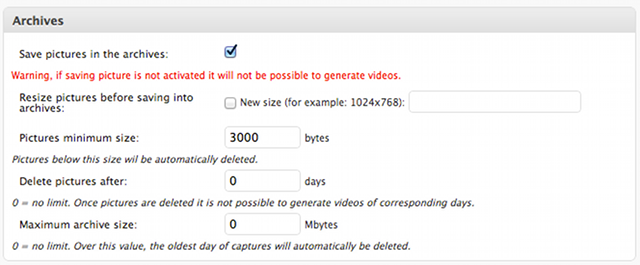
The following settings are available:
Save pictures in the archives: this option is a requirement to be able to generate videos. If not selected no pictures will be saved.
Resize pictures before saving into archives: we would only recommend this option if you are using a very high definition camera on a Webcampak with hard disk space limitations. It is usually advised to save pictures in the highest possible definition.
New size (for example: 1024x768): this is the target resolution.
Pictures minimum size: if a picture size is below this value it will not be processed and the system will consider capture failed. This size must be in bytes.
Delete pictures after: mention a number of days during which pictures will be kept in archives. Over this delay, pictures will be deleted automatically. Mention "0" for indefinitely.
Maximum archives size: maximum size of all pictures from the source on hard disk. If over this value, oldest pictures will be deleted (full day deleted at once). Mention "0" for indefinitely.
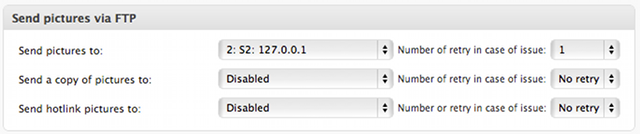
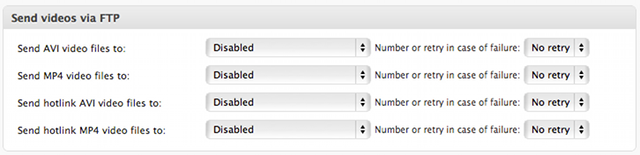
Once pictures are processed they can be send, via FTP, to a remote server (or another source from the same Webcampak). FTP servers are configured via a dedicated section mentioned earlier in this documentation.
At the end of the transfer, Webcampak will check the size of the picture on the remote server, if local size is different than remote size, transfer will be considered failed and the system can try to send the picture again (Number of retry in case of issue).
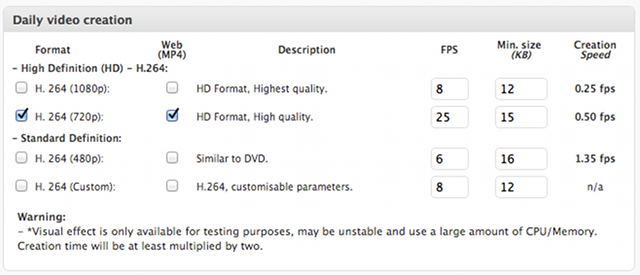
Each day, at 1:00 am, Webcampak will start creating a daily video of the previous day (if this option is activated).
For each format you can :
Create a MP4 video file to be inserted into a web page or opened with mobile devices,
Define minimum size of the video, under this value, videos will be deleted.
Webcampak is compatible with H.264 video codecs, with a set of pre-defined HD-compliant settings.
Tip
Take in consideration that HD TV usually display pictures in a resolution different from the one captured by DSLR cameras. At some point it will be necessary to modify pictures to fit those resolutions, we decided to do this by cutting the picture on the top and/or bottom. Take this in consideration if you want to add text in your video.
We usually recommend to test those settings via "Custom Videos" section, over a short interval (a few minutes/hours). Creation of the video will be fast and it will give you an opportunity to preview the result without waiting until 1:00 am.
The following codecs/formats are available:
H. 264 (1080p): HD, highest quality possible on consumer market.
H. 264 (720p): HD, high quality.
H. 264 (480p): DVD-like quality.
H. 264 (Custom): H.264, custom settings.
Processing speed will really depends of each format, higher is the quality, longer will be the creation and bigger will be the video file.
If your camera take very high definition pictures, H. 264 custom will let you generate very high quality videos (such as 4K).
Choosing FPS (frame per seconds) of your video will have a strong impact on the output. If you use high FPS, your video will look smoother but the video will be shorter. On the other hand, if you use a lower FPS, viewers will have more time to look at details.
The table below give a few video length sample depending of a few settings :
Table 5.1. Video length comparison
| Capture length | Capture frequency | Number of pictures | FPS | Video length |
|---|---|---|---|---|
| 24h | 5mn | 288 | 10 | 28s |
| 24h | 5mn | 288 | 24 | 12s |
| 24h | 1mn | 1440 | 10 | 2mn40 |
| 24h | 1mn | 1440 | 24 | 1mn |
As you can see, some configuration elements are static to ensure conformity with HD rules but it remains possible to adjust a few settings (crop, FPS).
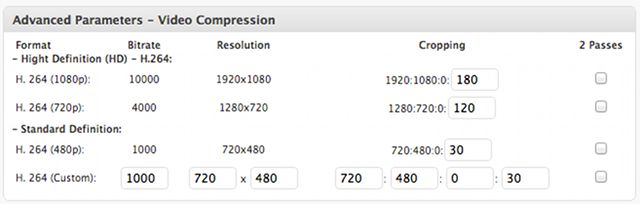
"H.264 Custom" let you choose the bitrate, resolution and crop areas. Those settings can be complex to configure and are explained in the following sections of this document.
As explained previously, during video creation we will convert pictures with a 4/3 like format to a video with a 16/9 like format but we don't want to stretch/alter the picture.
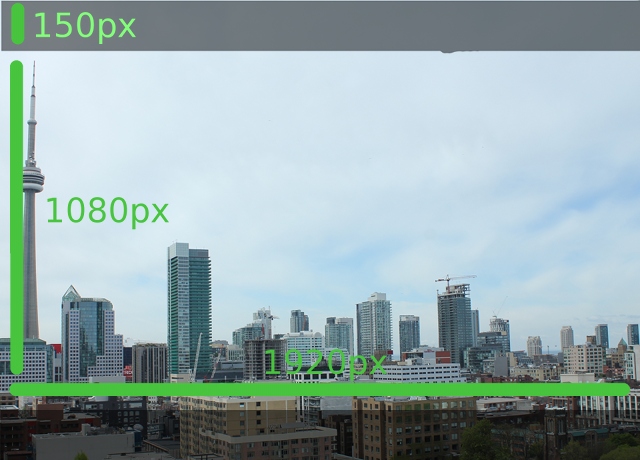
Let's take a simple example: we want to generate a 1080p video, this gives us a resolution of 1920x1080. Our 18Mpix camera take pictures with a 3904x2807 resolution (after a first crop)
Webcampak will resize the picture based upon X axis and will keep picture ratio, as a result we end up with a 1920x1380 picture (1920 x 2807 / 3904 = 1380).
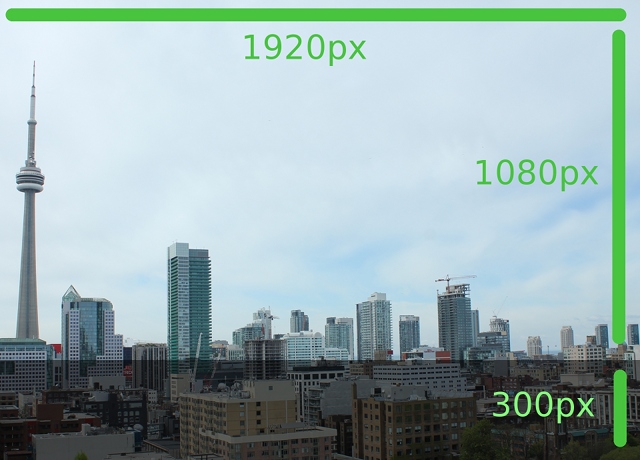
If we use a cropping value of 1920:1080:0:0, our video will only focus on the top of the picture as displayed above.
If we want to focus on buildings, we can crop on Y axis and use the following value: 1920:1080:0:300
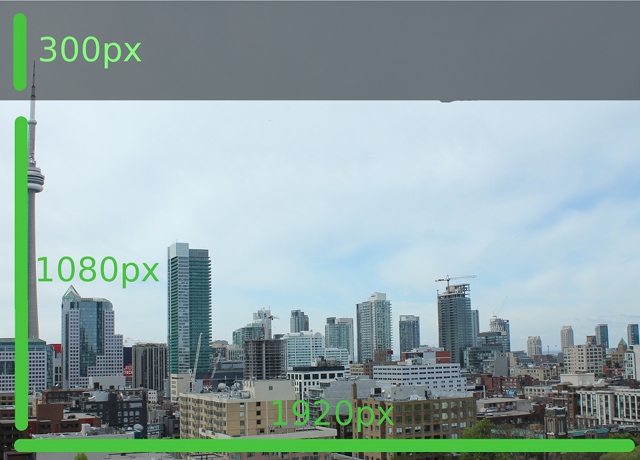
If we want to center the video, we can crop on Y axis and use the following value: 1920:1080:0:150
Example 1 details very simple manipulations and will be similar to 1080p, 720p and 480p formats.
By using H.264 Custom you can perform much advanced manipulations, and for example, zoom on a specific area of the picture.
Just consider you want to zoom on the crane on the right of the picture. Your first action will be to identify the area to focus on, this area must have the same ratio than target video resolution (to ensure you do not stretch the picture).
Let's take an area of 1920x1080 pixels, located at X:1824 et Y:1280 from origin point (top left corner of the picture
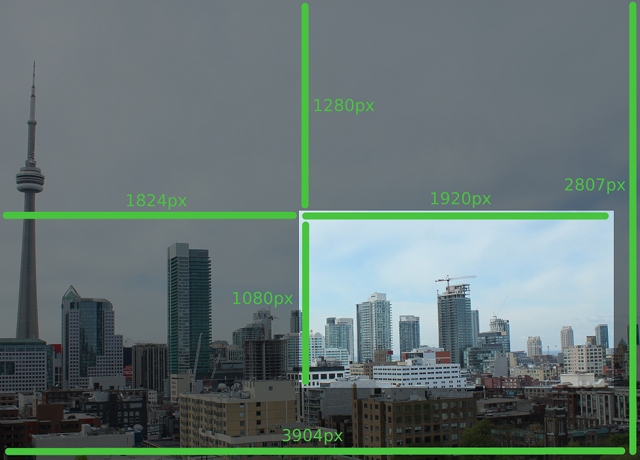
Custom video will be created using only the selected part.
This solution brings adaptability to Webcampak but is also complex. Identical results can be obtained using "Post-Prod. Vids." menu by applying modification on source pictures.
You can add a watermark into your video, this watermark will be added to the raw picture before any other modification configured on this page.
Please refer to "Photos" section of this document for more details.

This feature will remove similar pictures (i.e. if nothing has changed on a building site for example).
Changes such as luminosity will not be taken in consideration by this option.
In most situations, captured pictures include external elements (such as a road with cars passing by), we added the ability to mask those areas in order to filter only a specific area of the picture.
To add a mask, create a "PNG" picture with an Alpha channel (transparency) having the same size than your captured picture. Add color on top of all areas you don't want to be taken in consideration by the filter.
Upload the mask to /watermark/ directory of the Webcampak using global FTP account (wpresources).
You can find an example of a mask creation at the end of this document.
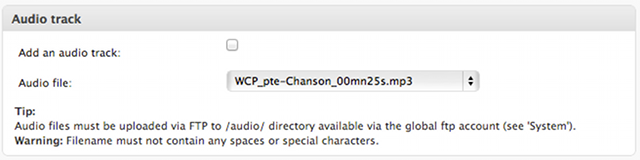
Webcampak let you add an audio track to your videos.
To add an audio track, login into global FTP account (wpresources) and copy MP3 files to /audio/ directory. This directory is shared between all sources.
MP3 filenames must only contain regular characters without blank space.
Add an audio track: select this option to add an audio track.
Audio file: select the file to be inserted.
Webcampak is compliant with playlist upon some conditions. Create a "playlist.m3u" file, this file must contain a list of MP3 files (one file per line)
Example of a "playlist.m3u" file
01-Yellow.submarine.mp3
02-Beat.it.mp3
Upload all files (M3U and corresponding MP3) via FTP to /audio/ directory.
During creation of the video, Webcampak will create a playlist.mp3 file, you can use this file for other videos and even rename it for later use.
Please refer to previous portions of this document for more details about how to insert text.
Resize: It might be necessary to resize pictures before processing (especially if using 18 or 21 mpix cameras) as the video core is not natively compatible with very high resolution sources.
Visual effect (test only): add an effect to your pictures (such as tilt shift), this is only provided for testing purposes.
This is a very specific situation and will not be detailed (as of yet) in this document.
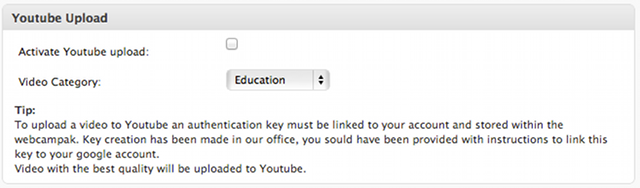
Once video has been created you can send it to Youtube automatically.
In order for Youtube upload to be operational an authentication key must be stored on Webcampak using your Youtube identification details. This manipulation must be done manually using SSH.
If multiple formats are created, only the one with the highest quality will be uploaded to Youtube (Youtube will then create smaller versions).
Activate Youtube upload: activate (or not) upload to Youtube.
Video Category: uploaded videos are assigned to a category.
A custom video is a video created, on demand, between a user-specified times.
Webcampak start custom videos creation tasks every 2mn so there might be a slight delay between the time you request creation and the time creation actually starts (not more than 2mn anyway).
Please refer to "Videos" section of this document.
Please refer to "Videos" section of this document.
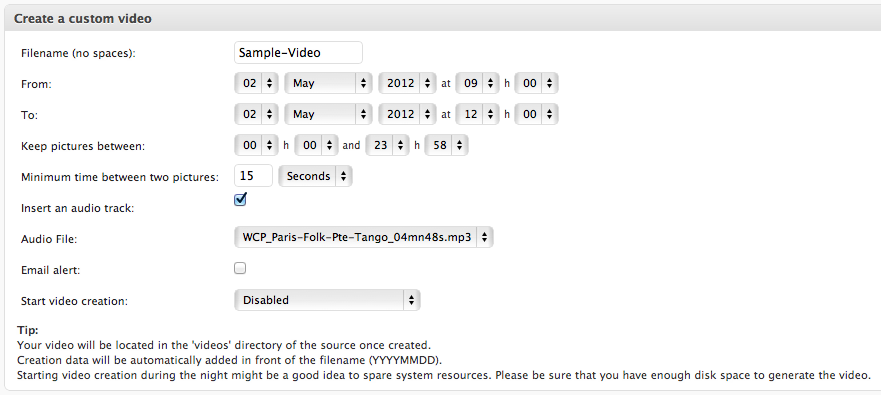
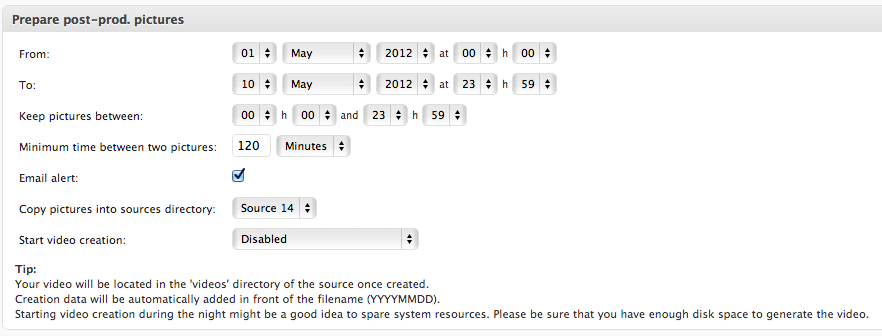
This section let you configure settings directly related to video creation (which could take hours if creation span multiple months).
Be careful with disk usage, Webcampak will copy all pictures to a temporary directory to apply modifications, as a result you will need free disk space corresponding to at least 2x the selected interval.
Following settings are available:
Filename (no spaces): Choose the name for your video file, if an identical name already exists creation will be aborted.
From: Select start date and hour.
To: Select end date and hour.
Keep pictures between: only use pictures between a specific timeframe (i.e. between 8:00am and 7:00pm) to create video.
Minimum time betzeen two pictures: when preparing your video, Webcampak will check time between two captures, if lower than this value, the picture will be discarded.
Insert an audio track: to add an audio track to your video
Audio file: select audio file to be added.
Email alert: select this option to receive an email once video creation is completed.
Start video creation: you can choose to start video creation as soon as possible or between 4h00 and 5h00 in the morning.
This section let you batch process pictures, we created it for multiple reasons:
Reduce picture size: by applying cropping/resizing pictures in batch it reduce the overall size of pictures to be inserted into a video manipulation software.
Advanced picture selection: by copying pictures to a dedicated source you can easily delete sequences by still keeping original pictures.
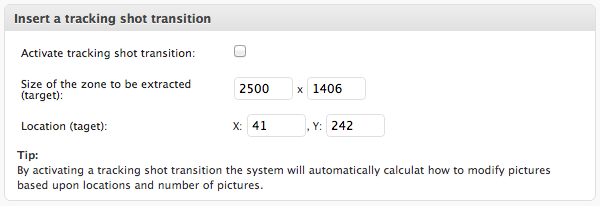
This section has a lot of similarities with "Videos" and "Custom Videos" sections but with much more functionalities. Once processing is completed you can use "Custom Videos" to generate a video of the target source.
By using various manipulations simultaneously you can achieve specific effects.
Please refer to "Videos" section of this document.
This module give you the ability to crop pictures.
To avoid any deformation, always keep the same ratio during all your manipulations.
This module is interesting to zoom on specific parts of the picture. You can for example display a portion at 200% of its original capture.
For example is you crop a 1280x720 zone and configure your final resolution to be 1920x1080, Webcampak will automatically resize your picture to 1920x1080, resulting in a zoom.
This module let you create a transition effect in your images.
You can achieve two effects:
Create a transition effect (move from one side of the picture to another).
Create a progressive zoom effect.
This effect will apply on the whole selected interval. Webcampak will calculate the number of shots to modify and apply the effect progressively to all pictures.
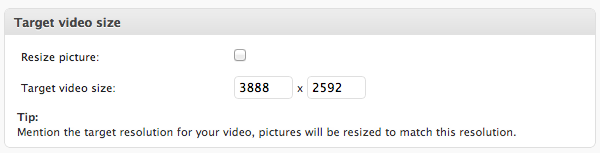
One pictures have been manipulated, the idea is to resize them to their definitive resolution.

This feature is provided for testing purposes only, this will let you apply an effect (such as tiltshift) on all your pictures.
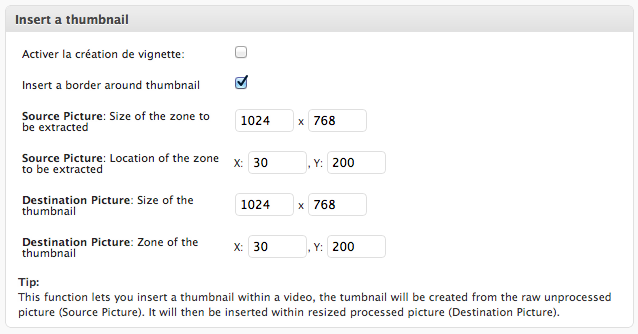
This module let you insert a thumbnail on top of your picture. Objective is to choose a zone in the source picture (similar to cropping feature) and copy it inside the final picture.
You can achieve two effects:
Insert a thumbnail displaying a "zoomed" via of a particular area.
Insert a thumbnail displaying the global picture in a "zoomed" sequence.
The option "Insert a border around thumbnail" add a border to create a clear difference between the thumbnail and the rest of the picture.
This section will display all major events related to source processing on Webcampak.
Following logs are available:
Picture capture and processing
Daily video
Custom video
Post-Prod video
We strongly advise to read logs in case of errors or just to ensure that everything is working as expected..
By default logs are cleared at the beginning of each rotation (for each picture capture, every 2 minutes for video creation and each day at 1:00 am for daily videos).
If you enable this option, logs will only be cleared if they reach a size bigger than 500KB.
Logs details all major actions performed by Webcampak during its operations.
11 May 2012 - 11:54:11 - gphoto(1-1267): Imagemagick: Crop: Zone size: 3904x2807 Position: x: 726 y: 7
A line of log is compose by::
11 May 2012 - 11:54:11 : Date of the action
gphoto: Kind of source (gphoto, webcam, ipcam, webfile, rtsp, phidget)
(1-1267): source ID - System process #
Imagemagick: Action type or module
Crop: Zone size: 3904x2807 Position: x: 726 y: 7 : Details about the action
Logs are also a good way to gather details about execution times of some Webcampak components.
For example:
11 May 2012 - 11:54:04 - gphoto(1-1267): Capture: Gphoto: Start Capture
11 May 2012 - 11:54:11 - gphoto(1-1267): New file is in location /capt0000.jpg on the camera
Saving file as /home/webcampak/webcampak/sources/source1/tmp/20120511115404.jpg
Deleting file /capt0000.jpg on the camera

11 May 2012 - 11:54:11 - gphoto(1-1267): Deleting 'capt0000.jpg' from folder '/'...

11 May 2012 - 11:54:11 - gphoto(1-1267): Capture: Check File: Successful
We can see on this example that picture capture takes 7 seconds (11:54:11 - 11:54:04), including:
capture time
download picture
delete picture from camera
11 May 2012 - 11:54:17 - gphoto(1-1267): FTP: Upload Archive
11 May 2012 - 11:54:17 - gphoto(1-1267): FTP: Server: s001.webcampak.com Directory:  /tmp/20120511/ Filename: 20120511115404.jpg Active: no Login: source10
11 May 2012 - 11:54:20 - gphoto(1-1267): FTP: Creation of  /tmp/20120511/ directory
11 May 2012 - 11:54:21 - gphoto(1-1267): FTP: Creation of  /tmp/20120511/1336751657.15/ directory
11 May 2012 - 11:54:21 - gphoto(1-1267): FTP: Transfering file, Try:(1/3)
11 May 2012 - 11:54:55 - gphoto(1-1267): FTP: STOR  20120511115404.jpg
11 May 2012 - 11:54:56 - gphoto(1-1267): FTP: Remote size: 3566523 / Local size: 3566523
11 May 2012 - 11:54:56 - gphoto(1-1267): FTP: File successfully sent to remote FTP
On the above sample we can extract two additional details: transfer time and upload bandwidth.
The overall picture transfer took 39s (11:54:56 - 11:54:17).
As mentioned in the logs, files are uploaded to a temporary directory and then moved to their definitive place. This way, is transfer is corrupted you will not end up with a partial picture in the system.
Effective bandwidth can be calculated by dividing picture size by transfer time. In this particular situation, we have 3566523 / 39 = 91449 bytes per seconds = 91 KB/s
It would be advised in this situation not to use a capture rate faster than 39s as the bandwidth will not be sufficient to transfer all picture. It is likely to end up with a saturation of the link, and of the system (after some time)
11 May 2012 - 11:54:56 - gphoto(1-1267): DiskManagement: Delete temporary files
11 May 2012 - 11:54:56 - gphoto(1-1267): Capture: Overall capture time: 52 seconds
11 May 2012 - 11:54:56 - gphoto(1-1267): -----------------------------------------------------------------------
Finally, overall capture time is 52 seconds which should be considered the minimum capture rate in this very situation.
You will find in this section, configuration module for advanced sections.
Webcampak is equipped with its own internal FTP server, it allows you to connect to a source to download a large amount of pictures or to allow pictures to be transmitted between sources.
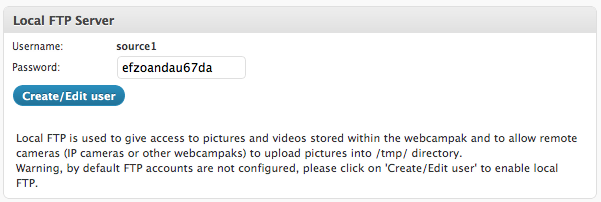
Each source has its own FTP account. a password is generated automatically during the installation process.
The FTP server is inactive until someone has clicked on "Create / Edit user".
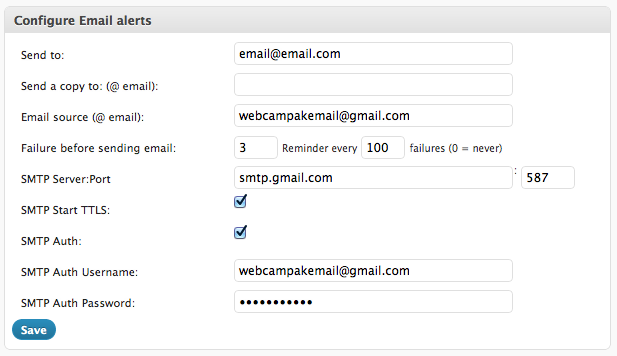
Webcampak can send an email in case of error, or to let you know when a custom video creation is completed.
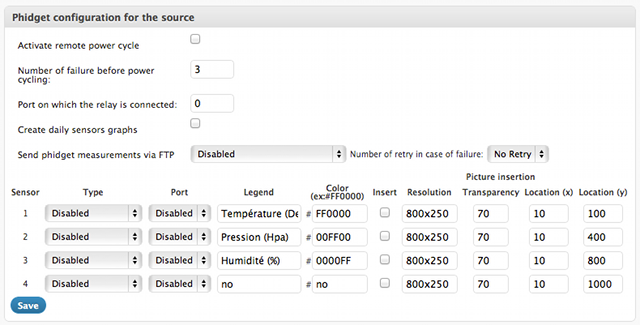
Phidget electronic board allows a DSLR camera to be automatically restarted in case of capture error.
Specify the number of errors before power-cycling the camera and the port on which the relay is connected.
You can also create a daily graph of sensor measurement and send this graph to a remote server. This section is not detailed (as of yet) in this documentation.
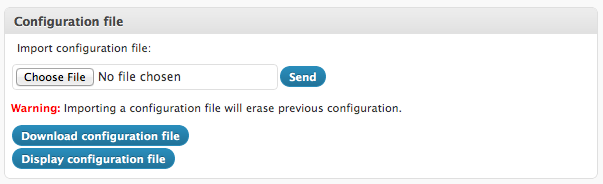
You can export/import configuration files onto the system.
Be careful, import/export is only available for systems using the same Webcampak version.

This section lets you manage pictures and gives you an overview of the number of pictures captured each day.