We detailed in the previous tab configuration settings related pictures acquisition. You should now have a captured picture ready to be manipulated.
Pictures tab is the place where you detail all manipulations to be applied to a picture.
Various configuration sections are arranged in a specific order, corresponding to the sequence of pictures manipulations. It is key to understand this aspect. For example a picture is first cropped, then a watermark is applied, and finally text can be added on top of the cropped, watermarked, picture.
When working with pictures coordinates you need to take this aspect in consideration. If you crop your picture, you need to used coordinates relative to the cropped picture.
All sizes and locations in this document and Webcampak interface are in pixels. With the exception of text, origin point is always the top left corner of the picture.

Once captured, you can crop the picture to keep only interesting elements. This option let Webcampak fir various situations:
"simple" crop: only keep a specific portion of a picture.
"wide" crop: change picture format (from 4/3 to 16/9 for example).
Zoom: this option can also be used to zoom inside a picture, by using multiple sources you can zoom in multiple areas of the same picture.
To crop your picture you need to detail two parameters:
Size of the area: in pixels, included inside the source picture.
Location: in pixels, from the top left corner.
We recommend to use a picture manipulation tool (The Gimp, Photostop, Pain.Net, ...) to try various situations and identify precisely coordinates.
Cropping pictures on the fly allow your viewers to focus on a defined area and ease video creation, if you use this option on very high resolution pictures you can extract multiple zones from a single picture.
A watermark is an image (a logo for example) inserted on top of a captured picture. This image must be "PNG" and have an "Alpha" channel (transparency).

To add a watermark, log into Webcampak global FTP account (wpresources) or source FTP account and copy the image to watermark/ directory.
Watermark file: select the file you would like to insert.
Transparency: define transparency of the watermark file when inserted on top of the picture.
Horizontal coordinate (X): define location of the watermark on X axis starting from left of the picture.
Vertical coordinate (X): define location of the watermark on Y axis starting from top of the picture.
If you plan to generate a timelapse at the end of your project and don't want to "pollute" your pictures with a watermark you can use cascaded sources. Watermark can also be added during video creation process (this is less efficient as all pictures will be processed together, it will slightly increase video creation time).
This option will insert text inside the picture (and on top of watermark if any), the following settings are available:
Text: Text to be inserted, a date can be added next to it (if you select a date, think about adding a separation, such as a blank space).
Date format: If you want to add a date, select its layout.
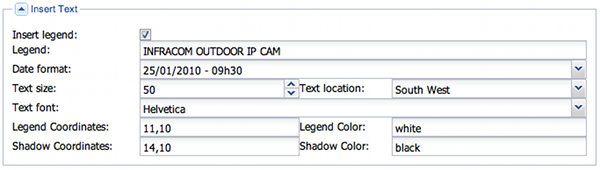
Define text settings, such as font and location:
Font size: size in pixels.
Text location: select reference location (coordinates will be calculated from this location).
Font: select the font.
Shadow color: to make the text easier to read you can add a shadow. Shadow is usually black or white.
Shadow coordinates: in pixels from text location. It is advised to move by 1 to 3 pixels compared to text coordinates.
Legend color: color of the text
Legende coordinates: in pixels from text location.
Coordinates are defined in pixels from reference point (text location), for example, if you want your text to be located 20 pixels from left of the picture and 40 pixels from the bottom of the picture you will choose the following settings:
Font coordinates: 24,40
Shadow coordinates: 26,40
Text location: South West
Static pictures (or hotlink) are pictures with a consistent name but content being updated regularly. It allows a webmaster to insert a live picture, generated by Webcampak, on its website.
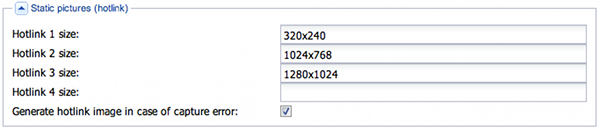
For example, if you want to upload a static image on your website (http://www.myconstructioncompany.com) in /webcam/ directory, you will be able to use, on your website, http://www.myconstructioncompany.com/webcam/webcam-1024x768.jpg to link to the latest captured picture. This file will be updated automatically and regularly by Webcampak.
Four different sizes are available to match various constraints (mobile, low bandwidth, high quality, ...).
This module define mechanisms to store and purge pictures automatically on Webcampak hard disk.
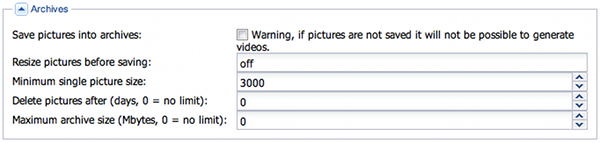
The following settings are available:
Save pictures in the archives: this option is a requirement to be able to generate videos. If not selected no pictures will be saved.
Resize pictures before saving into archives: we would only recommend this option if you are using a very high definition camera on a Webcampak with hard disk limitations. It is usually advised to save pictures in the highest possible definition. Either off or definition in WidthxHeight format (i.e. 1024x768)
Minimum single picture size: if a picture size is below this value it will not be processed and the system will consider capture failed. This size must be in bytes.
Delete pictures after: mention a number of days during which pictures will be kept in archives. Over this delay, pictures will be deleted automatically. "0" means no limit.
Maximum archives size: maximum size of all pictures from the source on hard disk. If over this value, oldest pictures will be deleted (full day deleted at once). "0" means no limit.

Once pictures are processed they can be send, via FTP, to a remote server (or another source from the same Webcampak). FTP servers are configured via a dedicated tab.
At the end of the transfer, Webcampak will check the size of the picture on the remote server, if local size is different than remote size, transfer will be considered failed and the system can try to send the picture again (Number of retry in case of issue).