Each day, at 1:00 am, Webcampak will start creating a daily video of the previous day (if this option is activated).

For each format you can create a MP4 video file to be inserted into a web page or viewed with mobile devices.
Webcampak is compatible with H.264 video codecs, with a set of pre-defined HD-compliant settings.
Tip
Take in consideration that HD TV usually display pictures in a definition different than DSLR cameras. At some point it will be necessary to modify pictures to fit those resolutions, we decided to do this by cutting the picture on the top and/or bottom. Take this in consideration if you want to add text in your video.
We usually recommend to test those settings via "Custom Videos" section, over a short interval (a few minutes/hours). Creation of the video will be fast and it will give you an opportunity to preview the result without waiting until 1:00 am.
The following codecs/formats are available:
H. 264 (1080p): HD, highest quality possible on consumer market.
H. 264 (720p): HD, high quality.
H. 264 (480p): DVD-like quality.
H. 264 (Custom): H.264, custom settings.
Processing speed will really depends of each format, higher is the quality, longer will be the creation and bigger will be the video file.
If your camera take very high definition pictures, H. 264 custom will let you generate very high definition videos (such as 4K).
Choosing FPS (frame per seconds) of your video will have a strong impact on the output. If you use high FPS, your video will look smoother but the video will be shorter. On the other hand, if you use a lower FPS, viewers will have more time to look at details.
The table below give a few video length sample depending of a few settings :
Table 8.1. Video length comparison
| Capture length | Capture frequency | Number of pictures | FPS | Video length |
|---|---|---|---|---|
| 24h | 5mn | 288 | 10 | 28s |
| 24h | 5mn | 288 | 24 | 12s |
| 24h | 1mn | 1440 | 10 | 2mn40 |
| 24h | 1mn | 1440 | 24 | 1mn |
TCe bloc vous permet de configurer les paramètres avancés des différents formats vidéo.

As you can see, some configuration elements are static to ensure conformity with HD rules but it remains possible to adjust a few settings (crop, FPS).
"H.264 Custom" let you choose the bitrate, resolution and crop areas. Those settings can be complex to configure and are explained in the following sections of this document.
As explained previously, during video creation we will convert pictures with a 4/3 like format to a video with a 16/9 like format but we don't want to stretch/alter the picture.
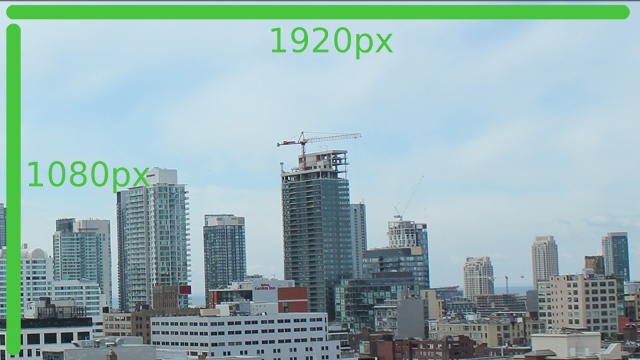
Let's take a simple example: we want to generate a 1080p video, this gives us a resolution of 1920x1080. Our 18Mpix camera take pictures with a 3904x2807 resolution (after a first crop)
Webcampak will resize the picture based upon X axis and will keep picture ratio, as a result we end up with a 1920x1380 picture (1920 x 2807 / 3904 = 1380).
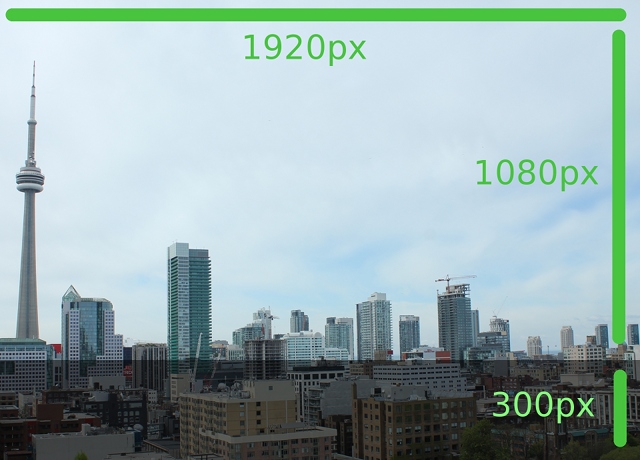
If we use a cropping value of 1920:1080:0:0, our video will only focus on the top of the picture as displayed above.
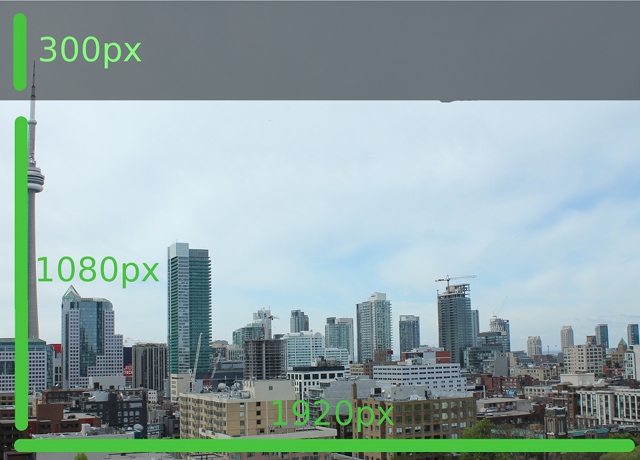
If we want to focus on buildings, we can crop on Y axis and use the following value: 1920:1080:0:300
If we want to center the video, we can crop on Y axis and use the following value: 1920:1080:0:150
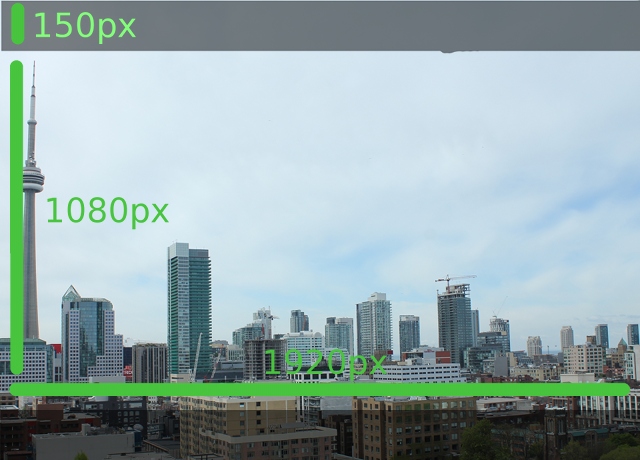
Example 1 details very simple manipulations and will be similar to 1080p, 720p and 480p formats.
By using H.264 Custom you can perform much advanced manipulations, and for example, zoom on a specific area of the picture.
Just consider you want to zoom on the crane on the right of the picture. Your first action will be to identify the area to focus on, this area must have the same ratio than target video resolution (to ensure you do not stretch the picture).
Let's take an area of 1920x1080 pixels, located at X:1824 et Y:1280 from origin point (top left corner of the picture
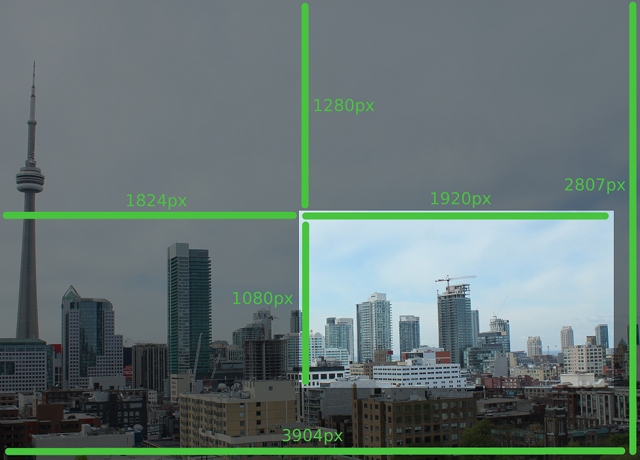
Custom video will be created using only the selected part.
This solution brings adaptability to Webcampak but is also complex. Identical results can be obtained using "Post-Prod. Vids." menu by applying modification on source pictures.
This feature will remove similar pictures (i.e. if nothing has changed on a building site for example).
Changes such as luminosity will not be taken in consideration by this option.

In most situations, captured pictures include external elements (such as a road with cars passing by), we added the ability to mask those areas in order to filter only a specific area of the picture.
To add a mask, create a "PNG" picture with an Alpha channel (transparency) having the same size than your captured picture. Add color on top of all areas you don't want to be taken in consideration by the filter.
Upload the mask to /watermark/ directory of the Webcampak using global FTP account (wpresources).
You can find an example of a mask creation at the end of this document.
Please refer to description in Pictures tab, configuration settings are identical.
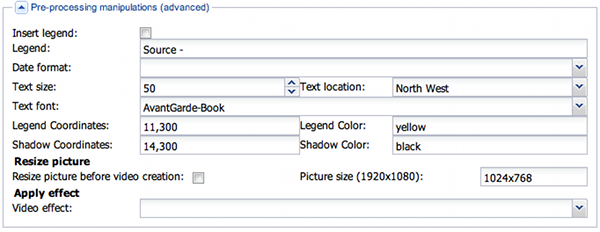
Please refer to previous portions of this document for more details about how to insert text.
Resize: It might be necessary to resize pictures before processing (especially if using 18 or 21 mpix cameras) as the video core is not natively compatible with very high resolution sources.
Visual effect (test only): add an effect to your pictures (such as tilt shift), this is only provided for testing purposes.

Webcampak let you add an audio track to your videos.
To add an audio track, login into global FTP account (wpresources) and copy MP3 files to /audio/ directory. This directory is shared between all sources.
MP3 filenames must only contain regular characters without blank space.
Add an audio track: select this option to add an audio track.
Audio file: select the file to be inserted.
Webcampak is compliant with playlist upon some conditions. Create a "playlist.m3u" file, this file must contain a list of MP3 files (one file per line)
Example of a "playlist.m3u" file
01-Yellow.submarine.mp3
02-Beat.it.mp3
Upload all files (M3U and corresponding MP3) via FTP to /audio/ directory.
During creation of the video, Webcampak will create a playlist.mp3 file, you can use this file for other videos and even rename it for later use.

Once video has been created you can send it to Youtube automatically.
In order for Youtube upload to be operational an authentication key must be stored on Webcampak using your Youtube identification details. This manipulation must be done manually using SSH.
If multiple formats are created, only the one with the highest quality will be uploaded to Youtube (Youtube will then create smaller versions).
Activate Youtube upload: activate (or not) upload to Youtube.
Video Category: uploaded videos are assigned to a category.
