Table of Contents
- 1. Capture tab
- 1.1. Source Configuration
- 1.2. Capture calendar
- 1.3. Configuration of "Compact or DSLR USB Camera (Gphoto2 PTP mode)"
- 1.4. Configuration of "USB webcam"
- 1.5. Configuration of "IP Camera (FTP) / Webcampak"
- 1.6. Configuration of "Internet Picture" or "Video Streaming"
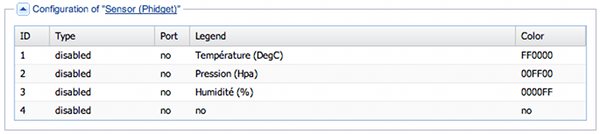
- 1.7. Configuration of "Sensor (Phidget)"
- 2. Pictures tab
- 3. Videos tab
- 4. Custom Vids. tab
- 5. Post-prod Vids. tab
- 6. Advanced tab
- 7. FTP Servers tab
Please note that Webcampak is provided preconfigured, you will therefore not have to perform most configuration settings mentionned in this part of the document.
To configure Webcampak sources, click on "Sources" icon on the dashboard or go to "Webcampak Menu > Configuration > Sources".
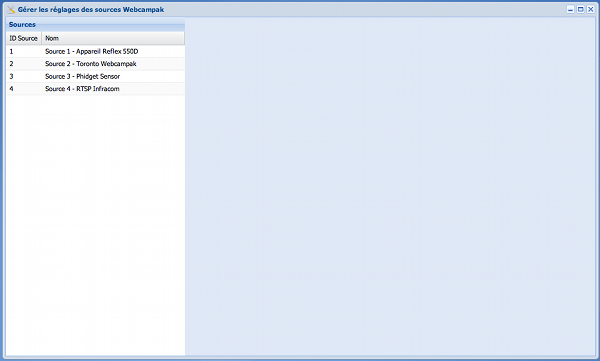
To begin configuration, select a source in the left portion of the window.
Please not that each time you select a different source or a different tab, the system will reload settings so save your modifications before doing so.

Webcampak sources configuration is divided in multiple tabs:
Capture: settings related to picture acquisition.
Pictures: settings related to picture manipulation (right after successful capture).
Videos: settings related to daily video creation.
Custom Vids.: settings related to custom video creation.
Post-prod Vids.: settings related to batch processing (apply a set of modifications to a large number of pictures).
Advanced: advanced settings (email, ...)
FTP Servers: list/configure FTP servers that can be used by the source to send its pictures
This tab contains all settings related to picture acquisition.

This is probably one of the most important par of Webcampak configuration, you will use it to define how/where to capture pictures and at which frequency those pictures must be captured.
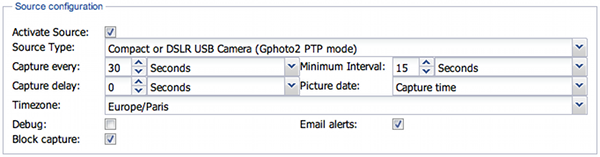
This option defines if the source is active or not. An inactive source will not be processed by Webcampak (for pictures as well as videos).
If you want to temporarily disable picture capture, use "Block capture" option available in this box.
Define how pictures should be captured, there is currently 6 different methods available:
Compact or DSLR USB Camera (Gphoto2 PTP mode)
Choose this option is a DSLR (or compact) camera is connected to Webcampak USB port.
USB Webcam
Choose this option is a usb webcam is connected to Webcampak USB port.
IP Camera (FTP)
Choose this option is an IP Camera, another Webcampak, or a source from this same Webcampak is going to regularly send pictures to the current source inside /tmp/ directory. Webcampak will regularly scan this /tmp/ directory and will process pictures if available.
Internet Picture (HTTP ou FTP)
Choose this option if you would like to capture a picture over HTTP or FTP. This picture can be located on the Internet, on another Webcampak, another source from current Webcampak ...
If you plan to use a Webcampak source here, you will need to link to a "hotlink" picture, just ensure you hotlink definition is big enough for your needs.
Video Streaming (RTSP)
Choose this option is you plan to capture a picture from a RTSP stream (IP Camera, CCTV system...)
Sensor (Phidget)
This option can be used to capture sensor values (those are not pictures) from Phidget boards.
Each of the above source type has specific settings that can be configured in other sections of Capture tab.
This is the option where you define the capture frequency, we advise you not to go below 10s when doing testing and not below 30s in a production environment (long lasting projects).
Possible values are highly dependent of camera's configuration.
Please note that if you want to use a frequency below 1 minute, you need to use a multiple of 60 (for example 10s, 15s, 20s, 30s).
This option is mainly here for stability purposes, this is the minimum time between two pictures. Any request below will be blocked by the system.
This option can be used to delay picture capture by a few seconds (or minutes).
If you select a frequency of one capture per minute, Webcampak will capture pictures at 18h00, 18h01, 18h02, ... If you configure a capture delay of 25s, capture will happen at 18h00"25, 18h01"25, 18h02"25, ...
Note: This settings can be applied to any source type except IP Camera.
This settings aims to define which date should be used when saving the picture, it can be either when capture request is initiated or when capture actually happens.
This feature is especially interesting when capture delay is implemented, especially with Internet Picture sources when source cascade is implemented (this is an advanced configuration scenario),
For example, one of your sources (source 1) capture one picture per minute with the objective of creation a timelapse video, you would like to upload one picture every 5mn to your website (source 2), When you capture a source 1 picture from source 2 you want to ensure that capture is completed before initiating the capture, therefore you would implement a capture delay of a few seconds (20s for example), but real capture time of source 1 will be T and not T+20s, therefore if you select "Script start time" source 1 date and source 2 date/time will be identical.
On the other hand, some specific usages might require very accurate dates, "capture time" will record date/time when picture was taken from camera.
Select the timezone corresponding to your source location, this settings is particularly interesting when Webampak is located in a different timezone than its source.
Use this option in case of capture issue, this option will disable automated log deletion. Do not use this option in a production environment.
Enable this option to receive emails from Webcampak (capture error, stats, ...).
Emails settings (destination email, SMTP server, ...) must have been configured properly for this feature to be operating.
Capture calendar will let select which days and hours you want captured to be enabled.
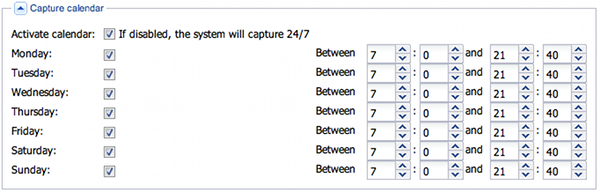
If you do not activate calendar, captures will be 24/7

Those settings are useful in case multiple cameras are connected to one single Webcampak, otherwise default settings will be sufficient.
To use multiple cameras, first activate the appropriate option is "Webcampak menu > Configuration > General", you will then need to specify Camera Model as detected by the system.
Camera Port settings is only useful if you want to force capture on a particular port. Please note that camera ports change each time the camera is connected/disconnected. We strongly advise to selection "Automated" option here.
If you use multiple cameras on a single Webcampak, the system needs to find a way to differentiate those (so that it does not mix pictures each time a camera is connected/disconnected or each time the system is restarted). Two options are available:
If you use different cameras, the system can use camera name to associate a particular camera to a source. Copy in "Camera Model" the model exactly as it is detected by the system in "Webcampak menu > Configuration > Connected Devices".
For example:
Model                          Port
----------------------------------------------------------
Canon EOS 550D                 usb:001,002
You need to mention "Canon EOS 550D" in Camera Model.
Before each capture, Webcampak will look for cameras and ensure the proper camera is attached to the proper source.
If cameras are identical (or detected identical by the system) Webcampak will insert a specific tag inside each camera.
First select the USB port (Camera Port) corresponding to the camera (connecting one single camera at this stage makes things easier).
Then, choose a tag to be inserted within the camera (Camera Owner), this tag should be simple, with no special characters and no spaces (for example CAM01) and save the page. This will add the tag to the camera.
You need to do the same manipulation on all connected cameras.
Please note that this is a very advanced feature that might be compliant with some specific cameras only, this configuration must be done within our premises (or remotely assisted by our team as some debugging might be necessary).
You can find all details about USB webcams in "Webcampak menu > Configuration > Connected Devices" section.
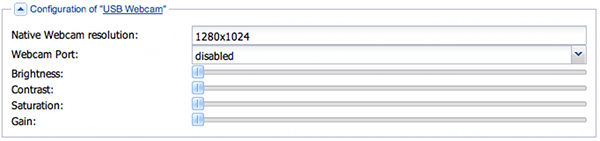
Mention the USB webcam native resolution as detected by the system in "Connected Devices" section.
This section can be used to configure how pictures coming from an IP camera or another Webcampak source should be processed.
This section is useful to create cascaded sources and apply multiple manipulations to one single picture by moving it from sources to sources.

IP camera or other Webcampak sources must be configured to send pictures, via FTP, to /tmp/ directory of the source.
Source FTP account can be configured in the "Advanced" section of each source.
With this configuration setting, define the process to be used by Webcampak to determine the capture's date, three options are available:
Date when file was uploaded to /tmp/ directory, expect this setting to be pretty inacurate
Filename (Webcampak), use this option if pictures are coming from another Webcampak
EXIF Metadata, use this option to gather the date from EXIF Metadata, your camera's clock must be accurate. Select this option if you want to import an offline timelapse into Webcampak.
When activated, Webcampak will only create a hotlink for the last captured picture uploaded to /tmp/ directory.
This option is interesting when capture rate on the current source is slower than capture rate of the source sending the picture (mutiple pictures processed at each rotation).
During a rotation, it migh happen that no pictures are available in /tmp/ directory (in case of network issue for example, or if Webcampak is suffering from a power outage).
If you tick this option, an email alert will be sent and an error image will be generated.
The situation is slightly different than a failed capture from a DSLR camera. An error in this particular situation could be caused by a network issue, and if the device taking initial shots is a Webcampak, it is very likely that pictures are still available (using Webcampak internal 230GB buffer). You will only have to upload pictures at a later stage.
Webcampak can capture pictures coming from Internet or from a video stream. This section also makes possible to capture pictures from another Webcampak or another source from the same Webcampak.

You can specify username and password using username:password@host syntax as shown above